
Anyway, I needed another one. I looked around online for how to do it, and I found one for this mouse, but it didn't have pictures and it wasn't the Santa that I remembered from my childhood. So, I had to figure that part out. And once I did, I sewed it together wrong, so I decided to write out how to do it, with pictures, so it might help someone else. And I might need these if we decide to make some more. We probably will because I have a bunch of leftovers, even with having to make 2 to get one sewed together properly.
I didn't even know if they made that plastic canvas stuff anymore, but it turns out they do! You can get it at Walmart - a pack of 6 sheets is only a couple of bucks.
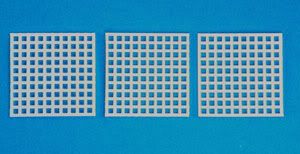
Step one, cut out 3 squares that are 10 squares wide.
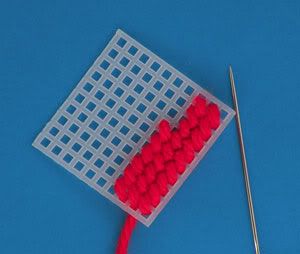
Start filling them in. I found that doing it across the diagonal gave it the best coverage. This is super easy to do. Rowan is 7, and he had a lot of fun filling in one of the squares for me.
You need to make 2 squares in red, and one square in the Santa face pattern. Here's the one that I designed. I think it might look better to use pink for his skin instead of yellow, but yellow is the yarn that I had, so that's what I went with for now.
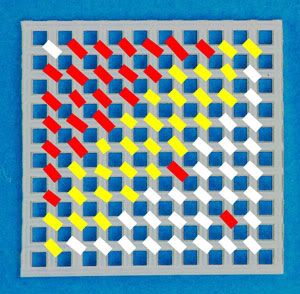
You'll need to use your judgement for eye placement. It looked off when I tried to draw them on there. Or you could use googly eyes. It would be fun to do that and use a small pompom for the top of Santa's hat.
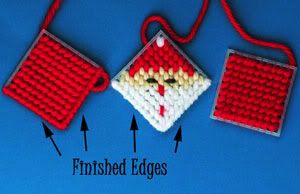
You need to finish two edges of two of the squares so you have a nice opening. This is one of the places I messed up before! I finished the edge that was all Santa beard, and then one edge of each of the other two squres. That's NOT what you want to do. Finish two edges of a red square and leave the other square alone. Make sure you do 2 or 3 stitches in the corners, so the plastic is all the way covered. I did 2 on the sides since they would end up being sewn, and 3 on the corners that would end up being the front.
You need to finish two edges of two of the squares so you have a nice opening. This is one of the places I messed up before! I finished the edge that was all Santa beard, and then one edge of each of the other two squres. That's NOT what you want to do. Finish two edges of a red square and leave the other square alone. Make sure you do 2 or 3 stitches in the corners, so the plastic is all the way covered. I did 2 on the sides since they would end up being sewn, and 3 on the corners that would end up being the front.
Now it's time to sew it together. I really don't know how to explain it well, so have another picture.
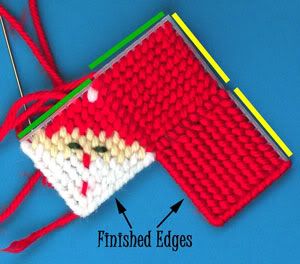
The square on the top is the one that didn't have any edges finished. You need to make sure the other two finished edges match up like shown. Then you will sew the green sides together, and the yellow sides together. It looks like it won't work, but it will, and you get a fun Santa!
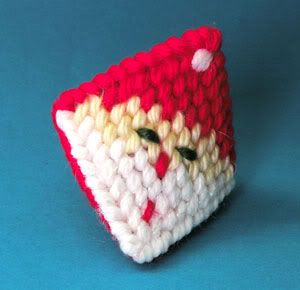
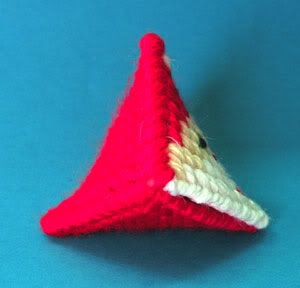
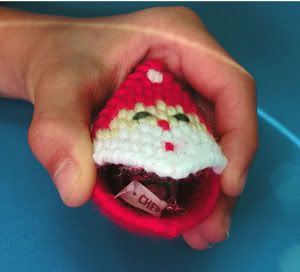
Isn't he cute? If you squeeze his cheeks, he'll give you a kiss.
23 comments:
This tutorial is great. I hadn't seen this one before. I have been writing about kissies for a while. I love this one.
Thank you! We had fun figuring him out.
Milli, did you get an email from me? I requested permission to use your picture in a squidoo lens linked to your page.
http://www.squidoo.com/plastic-canvas-kissies
If you want me to delete it, I will. I am just trying to keep the kissies alive. I have a lot of people look at this lens.
I remember these from my (not so long ago) youth. I made 2 this afternoon! Thank you for posting this tutorial.
I remembered these from when I was a kid. I have been wanting to make them for my girls. Thanks for the tutorial!
I have thought of these alot through the years..we had one on our Christmas tree when I was a child. I loved it! Thank you for sharing the instructions, I will definitely be getting the materials and making some for my toddler son to play with. I know he will love them, especially when he figures out there are "kisses" inside! :)
I just finished my first Santa, turned out super cute! Thanks for a great tutorial :)
Thanks so much for posting this! My Great Grandmother used to make plastic canvas ornaments and kiss holders at Christmas each year. I am trying to remember what she taught me and came across your pattern while searching on the internet. Your pattern will be bringing lots of sweet memories for me and joy for my kiddos this Christmas!
Thanks for the great instructions - I just made my first one and now plan to make quite a few more with my kids this weekend! Thanks so much!
my blog: lovez2read.blogspot.com
I have been looking for this pattern for years! Thank you so much for sharing! You have made 2 little boys and one grandma very happy!
Thank you for sharing I have been looking for this pattern for years and everyone I asked thought I was crazy :)
Hi! I just searched 'Squeeze My Cheeks to Get a Kiss' on Google and it came up with this. I got one a few years ago and I've always wanted to know how to make this! Thanks for posting it!
~Azure
Super cute and looks simple by your great tutorial. Thank you for sharing! <3
My grandmother had some of these when I was growing up, and I always had fun finding where she had hidden them in the tree...
Over the years, between moves and hurricanes and life, they have been lost or destroyed.
Thanks for sharing this so I can surprise her this year by making some and reinstate our tradition!
Only now, *I'll* do the hiding! Thanks so much for posting this!
We have a group of ladies that made items for several nursing homes in our area. Last year we gave them Reindeer Kissies to put on their lunch tray and I have been looking for the Santa. Thank you. We now have to be busy to get 200+ made before the middle of December.
I have been trying to make squeeze ums for awhile now & I wasn't understanding & not getting it. your pictures made it so much simpler for me I have now made one & plan on doing many more.... thank you so much!!!!!!!!!!!!!!!!
I hadn't seen this before, but I'm glad that I found it, it is so cute
Thank you so much for this tutorial. My oldest son saw it and he wants to make some for his teachers
thank you so much for posting your tutorial for us all. I have never seen these before and so had no idea how they were made but was told about them by an American friend so decided to check them out. I have used your pictures as a guide and have almost completed fifty of them. they will be placed by the table settings at a Christmas camping rally so every one will have a memento of the meet to take hmw with them. i have had such good fun creating the santas and as i do them when i am away in my tiny motor home and most often sat out in the sun folk have stopped to speak and ask what i was making I have shown the finished santa and a few have received one as a small gift so i will have done more than the amount i set out to do but when those folk put them up n the Christmas tree this year they will remember me and a lovely day sat out in the sunshine sharing a drink of tea or coffee. by the way i live in the UK so just see how your ideas are spreading across the world. Thank you . annie in the uk
Thanks for sharing! One of my members of my Plastic Canvas Crafters group on Facebook was looking for this pattern. I plan to make some for my Sunday School kids, as well as all my great nieces and nephews, and possibly for some nursing home residents, too.
Thank you so much for sharing this tutorial! My grandsons are enjoying a Christmas bird squeezie that was mine decades ago, but it's beginning to fray. They'll be thrilled to receive these Santas of their very own.
Haven't seen these in years!! I remember getting one as a kid!
I just found this while searching for other little things to make with plastic canvas. I remember having the reindeer when I was little. Just made one and my son loves it. He starts kindergarten this fall and I'm going to try and figure out a way to make it look like a heart for valentines so he can give them out in school. Thanks for the pictures they helped out!
I cut my canvas squares. I stitched them and then got all thumbs trying to put them together. Your tutorial was the best. Everything went together post haste. Many thanks for your help. I have a world of stitching ahead of me.
Post a Comment